
Substitutes for the SparkFun SerLCD Display
Quick Links
- A SerLCD Emulator using an Arduino Uno and an LCD Shield (single-color backlight)
- A SerLCD Emulator using an Arduino Uno and a DFRobot LCD Shield (RGB backlight)
- A SerLCD Emulator using an Arduino Nano and a standard parallel 16×2 LCD display (both single-color and RGB backlight)
- The Arduino code for the SerLCD Emulators
Learning the Art of Electronics uses the SparkFun 16×2 SerLCD with RGB Backlight in Chapter 26 to demonstrate the SAMD21’s SERCOM peripheral and in the Lullaby Jukebox of Chapter 27. The standard 16×2 LCD character display only suports a parallel interface but the SparkFun display supports all three common serial protocols, UART, I2C, and SPI. We use the latter in the book to drive the display because it is the easiest mode to demonstrate the use of the SERCOM.
Unfortunately, the SparkFun SerLCD has gotten quite expensive (USD$ 32.50 as of 4/2026 — but note that it is currently $6 cheaper at Amazon).
You can build a replacement display using a standard (i.e., parallel) LCD character display for about half the cost or even less if you are willing to give up the RGB backlight feature. Here is a video demonstration of the various options described in detail below:
A SerLCD Emulator using an Arduino Uno with an LCD shield (single-color backlight)
The Arduino Uno uses the original Arduino form factor which allows daughter boards, called “shields” to plug into the Arduino I/O pins. To emulate the SerLCD, You plug the LCD shield onto the Uno, program the Uno using a PC and USB cable, then connect the Uno to the SAMD21 using the same five connections (+5V, Ground, Chip Select, Data Out, and Serial Clock) that you use for the SparkFun display. (You do not need the +5V line if you are powering the Arduino though the USB or the power jack.)
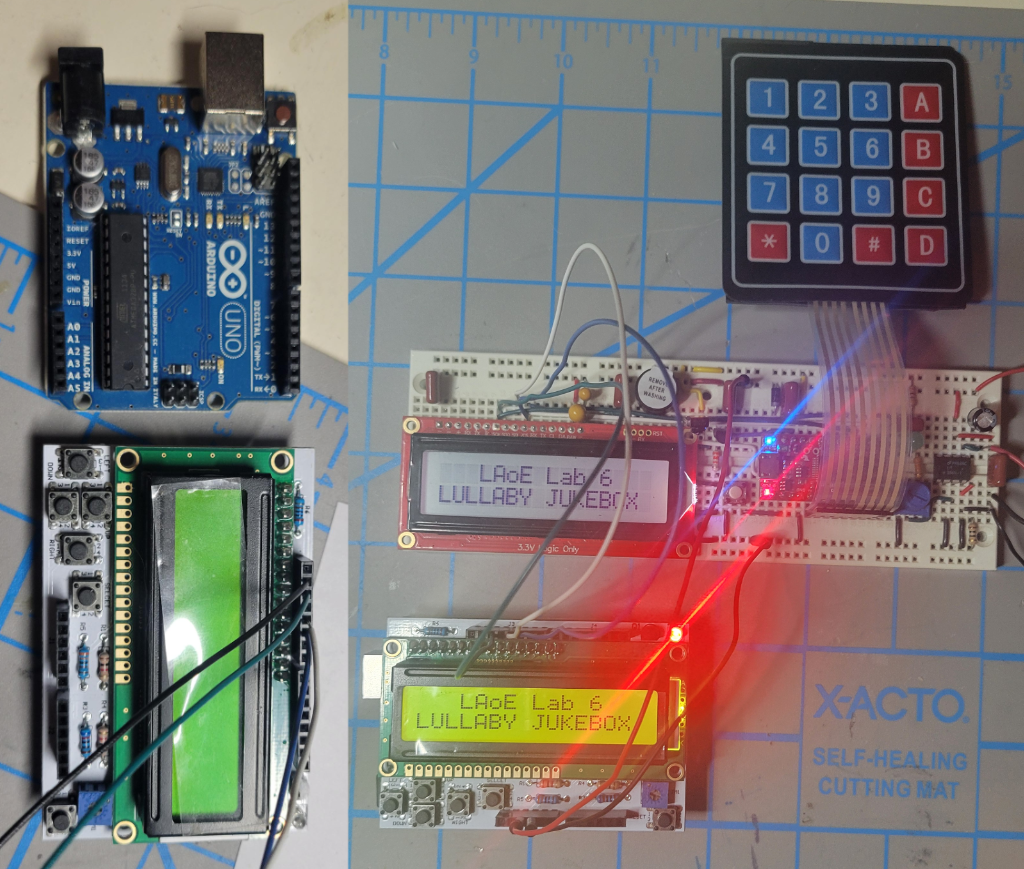
On the left are the Arduino Uno and the LCD shield separated. On the right, the shield has been plugged onto the Uno and the pair are operating in parallel with the actual SparkFun SerLCD. This example uses an Arduino Uno purchased from SparkFun and a LinkSprite LCD shield. The LinkSprite shield provides sockets for most of the Arduino pins (to allow you to plug in another shield — which makes no sense as it would block the display), but that makes it easy to plug in the five wires for SPI communications.
The disadvantages of the Uno/LCD Shield approach are that it may not be not the cheapest substitute for the SparkFun SerLCD and that LCD shields are commonly available only with a single color backlight. That means you will not be able to see the Wurlitzer-like color changing background in the Lullaby Jukebox project. (But there is one RGB backlight shield available. See the DFRobot LCD Shield (RGB backlight).)
A complication with this approach is that the LCD shields use Arduino Pin 10 to switch the backlight off and on. Setting pin 10 high turns the backlight on and a low signal turns it off. A pullup resistor ensures that the backlight is on when pin 10 is floating after a reset and means code does not have to program pin 10 if it wants the backlight on all the time. Unfortunately, the Uno internal SPI peripheral requires that pin 10 be used for SPI chip select. This means that on some models of the LCD display whenever you send characters to the display, the backlight flickers when chip select is pulled low to select the display. This is not that much of a problem since characters are sent to the LCD fairly quickly so the flicker does not impact the readability of the display.
However, depending on the version of the LCD shield you have, you may not (and should not) connect the SPI chip select (CS or SS) line to the shield. LCD shield manufacturers use several different circuits to switch the backlight. In general, the shields are poorly documented but here are three different circuits that we were able to find for the LCD backlight switch.
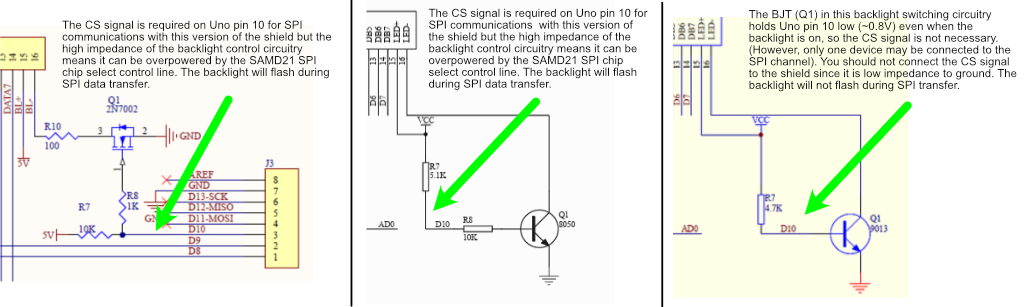
Three different backlight switching circuits on different manufacturers’ LCD shields. The two on the left require the SPI chip select to be connected to Arduino Uno pin 10. However, the CS line should not be connected to pin 10 on the rightmost version of the LCD shield.
The circuit on the left (one of the two we tested) has an input impedance of about 10k and pin 10 is held at a logic high by default. The SAMD21 has no problem driving this line low to select the shield for SPI data transfer. The middle one has an input impedance of about 3.5k but, again, it should work fine with SPI and requires the CS line to drive it low. However, the circuit on the right (which we also tested) holds pin 10 at about 0.6V to 0.8V max, meaning that SPI chip select to the Arduino is always asserted. This works fine as long as the Arduino Uno is the only thing connected to the SAMD21 SPI communication lines. You should not connect the chip select if you have this version because it is poor practice to tie a microcontroller line low (and if you do the backlight will flash like the other two versions).
You can test if you have the third version by plugging the shield into the Uno and measuring the voltage at pin 10 with the backlight on. (If the backlight is not on, try loading the Blink example program.) If it is less than 1V, you should not connect the chip select (pin 10). You could also just hook up the Arduino/LCD Shield without the chip select line and if it does not work, add it.
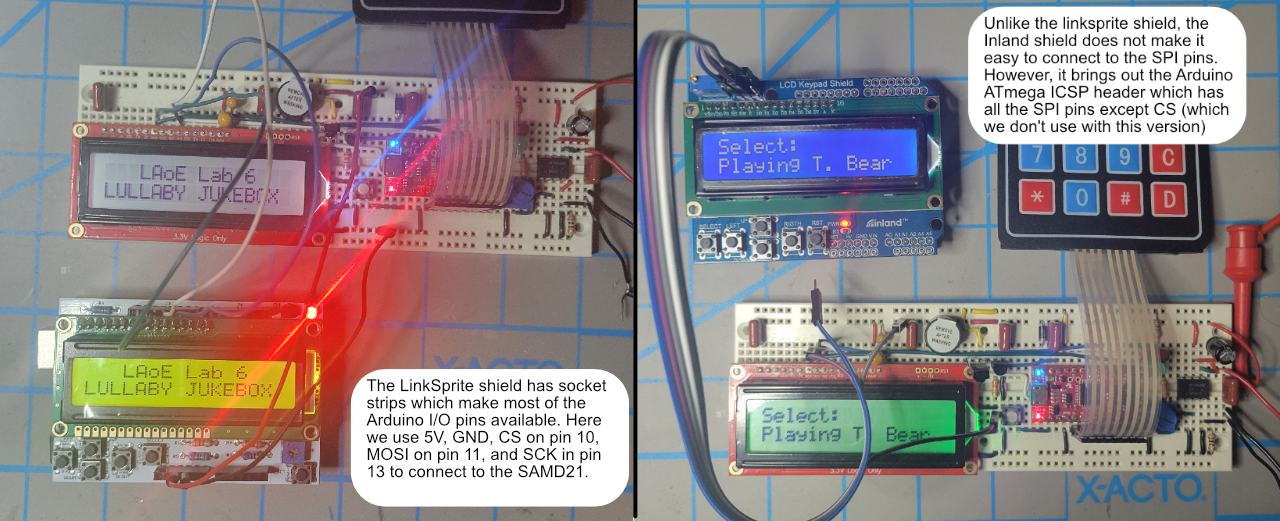
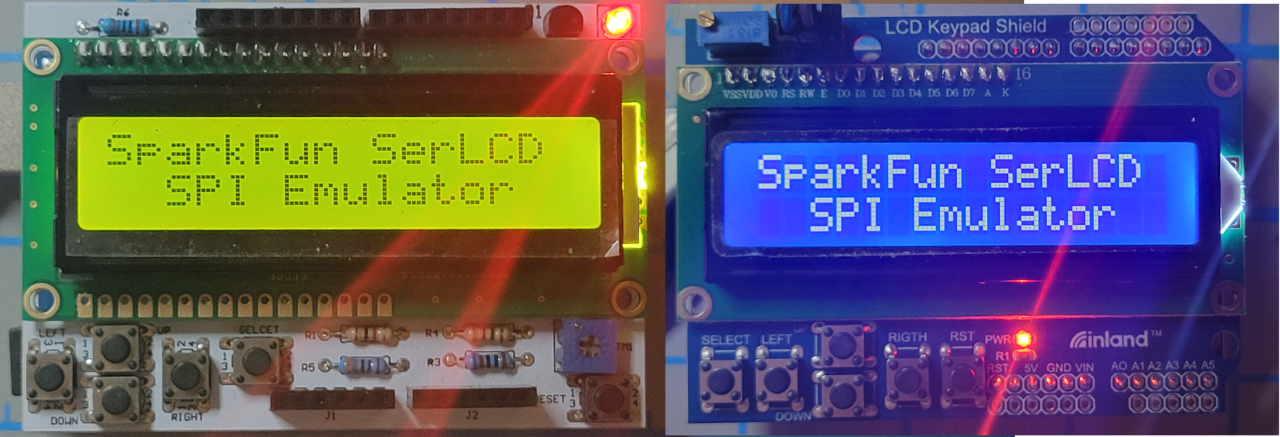
Comparison of two Arduino versions of the SparkFun SerLCD emulator, on the left the LinkSprite shield and on the right the Inland (Microcenter) shield.
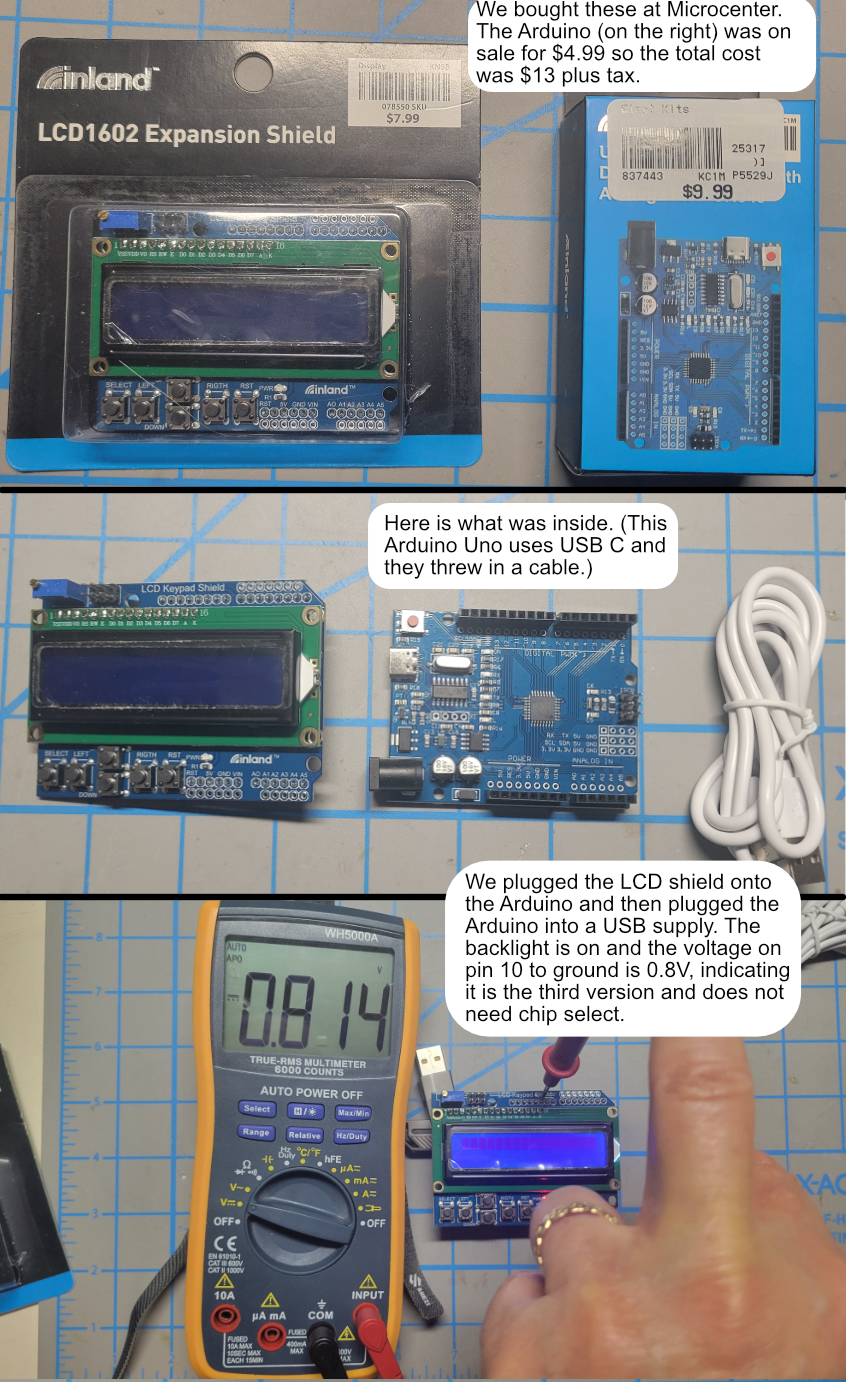
Here is how to test the Arduino LCD shield to see if you should connect the SPI chip select line or not. Since pin 10 is less than 1V, you do not need the chip select line.
Some Arduino LCD shields bring out the 6-pin ICSP (In-Circuit Serial Programming) connector. This connector has all the signals required for SPI communication except the chip select signal. You can use it in place of the edge pins if you like. The Inland shield we purchased at microcenter had solder holes for all the edge signals except the SPI signals so we used the ICSP connector instead (and luckily it did not need the chip select line since it was the third version with a low CS line — see right hand image above).
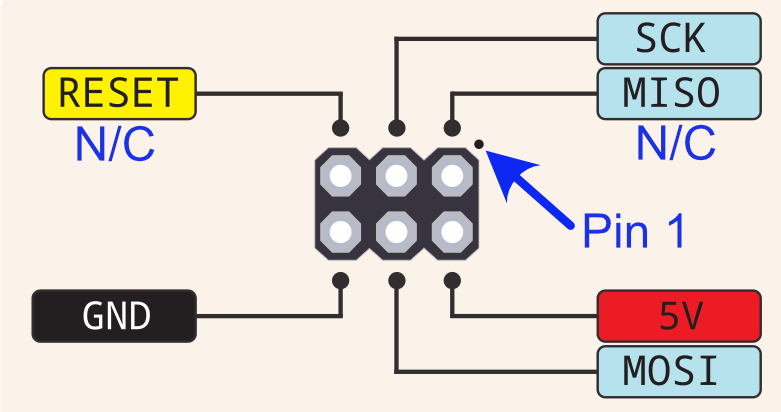
Pin configuration of the Arduino ICSP connector (top view). MOSI and SCK connect to the the SPI outputs of the SAMD21. The SAMD21 and the Arduino must share the same ground. If using the two leftmost versions of the LCD display backlight control circuitry, the SAMD21 SPI chip select must be connected to Arduino pin 10.
Parts cost for the Arduino shield version of the SparkFun SerLCD Emulator (single-color backlight)
The Arduino Uno and LCD shield are commonly available in electronics stores like Microcenter and online (eBay, Amazon, Walmart, etc.) Here are some representative examples (items marked with a “*” are parts we have tested ourselves).
The Arduino Uno
(Other ATmega based Arduinos may work as well. If you already have another ATmega board and it works, please email me to let me know at parts@laoe.link)
All prices in USD$ as of 4/2026.
Microcenter Inland UNO R3 Development Board with CH340 $4.99* (Possibly a temporary sale price.) This version uses a surface mount version of the ATmega328. It worked fine in the SerLCD Emulator. It also uses a USB C connector in place of a USB B plug.
Microcenter Inland Uno R3 Arduino Compatible $9.99 This version uses a DIP version of the ATmega328.
Amazon R3 Development Board, Single Board $7.99 An Amazon search for “Arduino Uno” returns many different products under $10.
Cytron Technologies ATmega328P Masker Uno at Digikey $9.41 This is convenient if you are already placing a DigiKey order.
eBay has many choices some shipped from US sellers and others shipped from China (which can take a while to get to you).
You can check Walmart as well but we have found they tend to claim to have something we want in stock, but we have to add something we don’t really need to get free shipping and then they only send the thing we didn’t really need and tell me the thing we really wanted is out of stock.
The 16×2 LCD1602 Shield
(Single-color backlight)
The 16×2 LCD displays come in two forms, one with black letters on a bright background (positive display) and another with a darker background and the letters lit up in the backlight color (negative display). Either will work — it is a matter of user preference (although we think the positive LCD works better with the RGB backlight but either works fine for the single-color backlight version). Note that several of the shields appeared not to work because the contrast potentiometer was not set correctly. Be sure to adjust the contrast until you can see the all the 5×7 character dots then back off the contrast until only the selected ones are visible when you first try to use it.
Comparison of positive display LCD (left) and negative display LCD (right)
Microcenter Inland LCD Expansion Shield $7.99* This uses the version of the backlight control circuitry that does not require chip select.
Cytron LCD Keypad Shield for Arduino $4.85 This looks like the same product as the Microcenter Inland shield.
1Elec602 LCD+Keypad Shield $3.00 This looks like the same product as the Microcenter Inland shield.
DFRobot KeyPad Shield for Arduino DFR0009 at Digikey $9.90 Again, this is convenient if you are already placing a DigiKey order. (This is not the DFRobot LCD with an RGB backlight. It is a standard single-color backlight 16×2 parallel LCD display.)
eBay has plenty to choose from – we ordered this one with free shipping from China $3.17 (Less than a coffee at Starbucks.) It took 20 days to get to us but works fine. It appears to be identical to the Microcenter LCD Shield without the “Inland” branding. So teamed with the $4.99 Microcenter Arduino Uno, we put together a single-color backlight SerLCD replacement for $8.16 (plus tax).
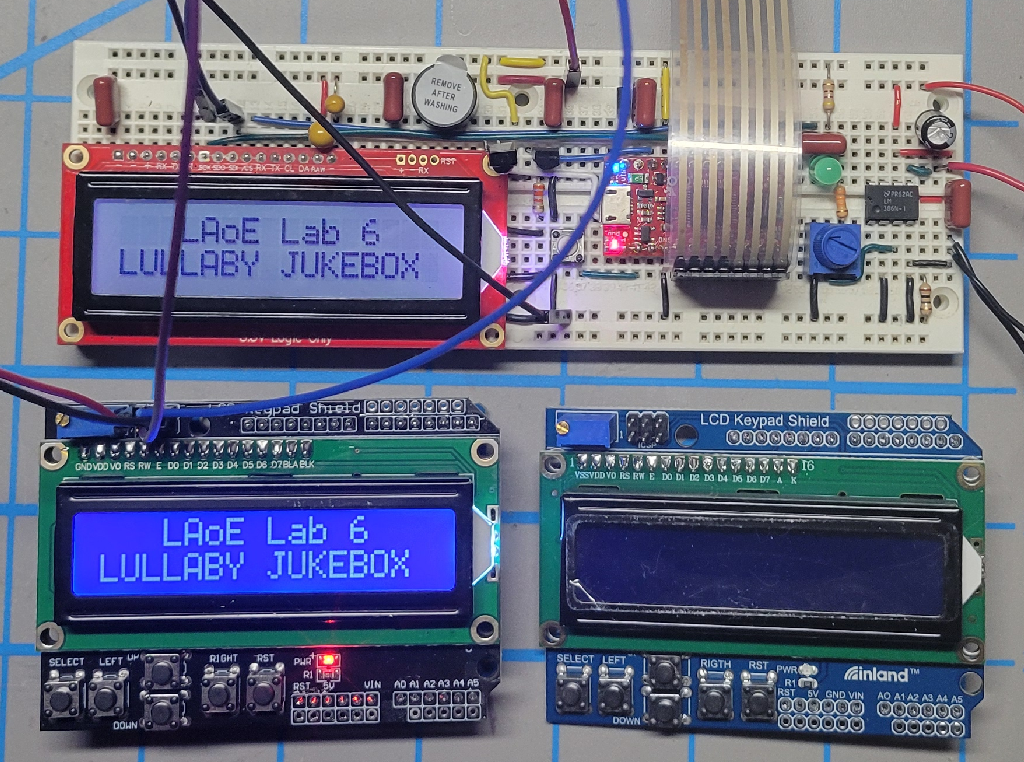
The eBay $3.17 single-color backlight LCD Shield on the lower-left works fine if you are not in a hurry (it took 20 days for the order to arrive from China). It appears to be almost identical to the $7.99 Microcenter LCD Shield on the right.
Similarly, AliExpress has many choices in LCD shields, again some as inexpensive as $1.00 (We even saw one free offered with any purchase as a “welcome gift”).
The LinkSprite LCD shield we tested no longer appears to be available.
The Arduino Uno and 16×2 LCD shield are available from many other sources as well. So as long as you are willing to accept a single-color backlight, it appears you can put together the Arduino Uno/LCD shield version of the SparkFun SerLCD emulator without much work for less than $20 and possibly for much less (we paid $11.98 plus tax for our Uno and LCD shield from Microcenter and $8.16 after waiting for the LCD shield we ordered on eBay from China).
See below for the software to load on the Arduino Uno to emulate the SparkFun SerLCD.
A SerLCD Emulator using an Arduino Uno with a DFRobot LCD shield (RGB backlight)
We found one multicolor backlight 16×2 shield, the DFRobot DFR0374. It is available directly from DFRobot and at Mouser and DigiKey for $12.90 plus $2 to $4 tariff fee plus shipping. It uses I2C rather than a parallel interface for the backlight control, so it requires a different version of the Arduino the code described below. However, since it does not use pin 10 for backlight control, it does not blink when the Uno is sent SPI messages. The backlight colors on the DFRobot display are much brighter than the SparkFun SerLCD and the characters are larger making the text more legible. It not only is cheaper than the SerLCD, it is a nicer display. (However, you don’t get I2C and RS232 support with the Uno/DFRobot LCD unless you are willing to modify the Uno program to add it.)
Comparison of SparkFun SerLCD and DFRobot LCD display. The DFRobot backlight is much brighter and the characters are larger. If your Arduino Uno has the additional holes like the one shown, you could solder the other four interface wires directly to it as well.
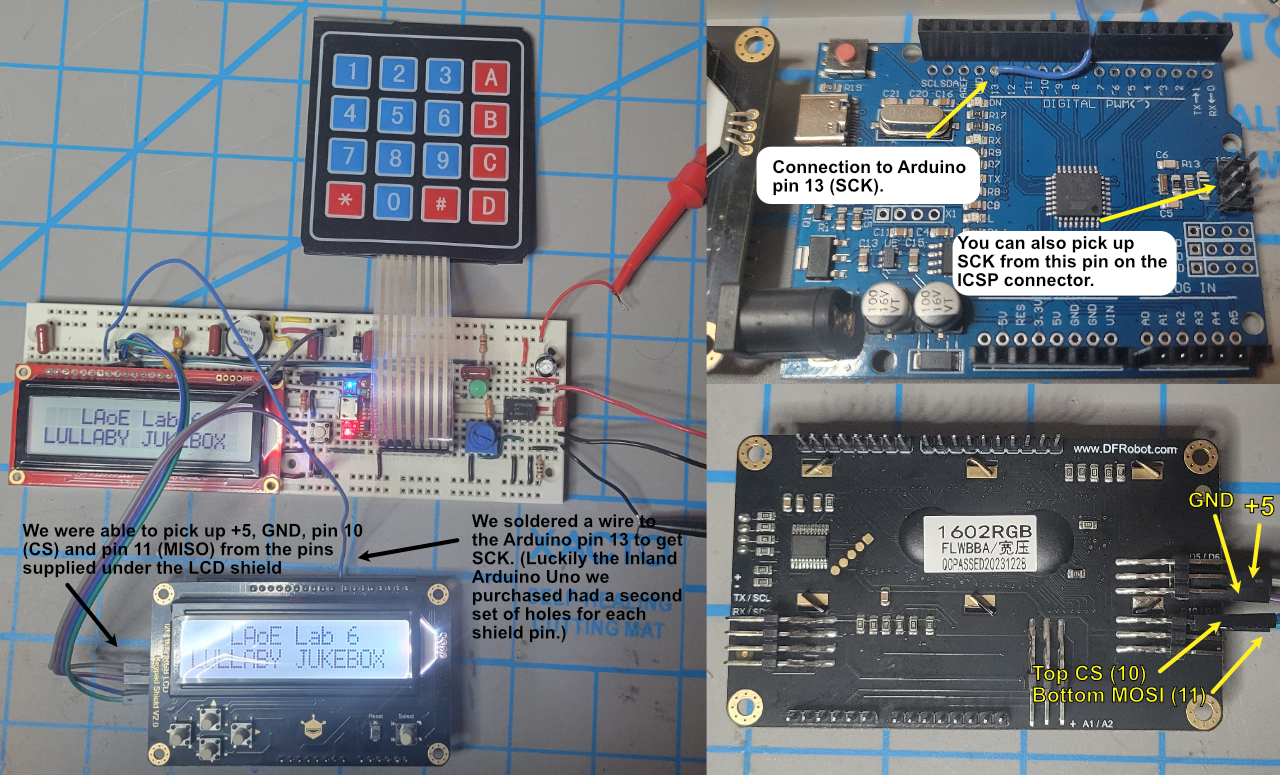
The downside of the DFRobot shield is that connecting up the Arduino and DFRobot shield to the SAMD21 SPI is a bit difficult. Unlike the single-color LCD shields discussed previously, the Arduino pins are not brought out on matching header connectors nor is there an ICSP connector on the DFRobot shield. Power (+5), ground, pins 10 (CS) and 11 (MOSI) are brought out on a connector under the shield but pin 13 (SCK) is not available anywhere on the shield (other than soldering a wire to the pin directly). Luckily, the Inland Arduino Uno we bought at Microcenter had a second set of holes next to the shield connector and we were able to solder a wire to pin 13 for SCK. You could also connect to the SCK pin of the ICSP connector on the Uno itself (see image). We could not find a contrast adjustment on the DFRobot display, but the one we purchased had the contrast adjusted correctly.
Prices for the Arduino Uno were previously discussed and they are commonly available for between $5 and $10. You might want to search for an Uno that includes the extra set of header pins like the one shown above to make connecting SPI to the LCD shield easier.
As noted in the introduction, the DFRobot I2C RGB Backlight LCD Shield (p/n DFR0374) lists for $12.90 and Digikey and Mouser orders tack on a $2 to $4 tariff. There is a negative version of the DFRobot display (p/n DFR0936) for the same price if you prefer that look. This means you could put together a RGB backlight SerLCD emulator about $20 to $25 if you can keep shipping charges down. DFRobot has free shipping for orders over $50 but it looks like their tariff charge is much higher which is why we ordered one from Mouser. (Digikey had a lower tariff and shipping charge but they were out of stock.) If you are outside the US it may make sense to order from DFRobot directly.
See below for the software to load on the Arduino Uno/DFRobot LCD to emulate the SparkFun SerLCD.
An Emulator for the SerLCD using an Arduino Nano and a 16×2 LCD with an RGB backlight
While easy to put together, the Arduino Uno/LCD Shield emulator suffers from one major deficiency, only the DFRobot LCD display allow you to duplicate the multicolor RGB backlight of the SparkFun SerLCD. If you have to pay shipping and a tariff, it could end up costing almost as much as the SparkFun SerLCD. With a bit of effort wiring, you can replicate the SerLCD almost exactly with a standalone RGB backlight 16×2 LCD display and an Arduino Nano.[1]
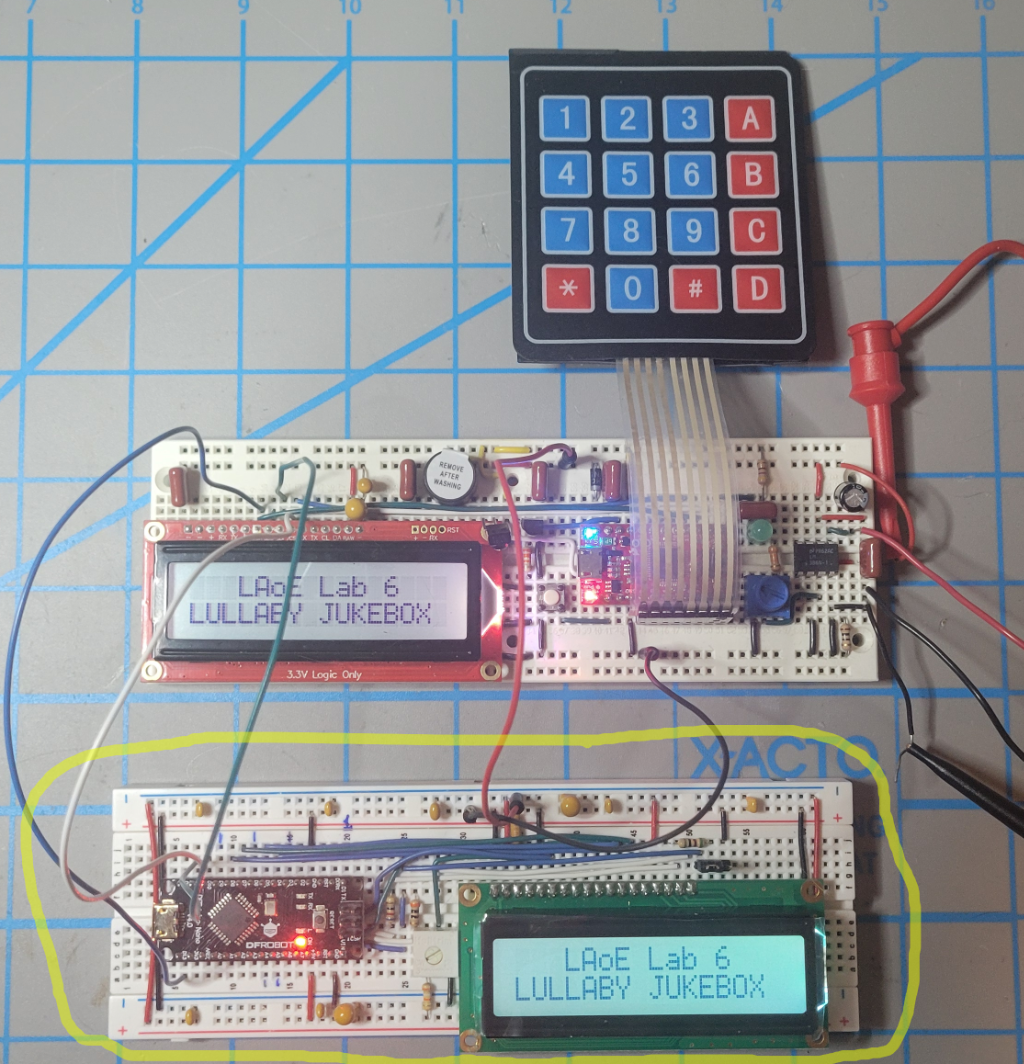
The Arduino Nano/RGB LCD version of the SparkFun SerLCD emulator running in parallel with the real thing in the Lullaby Jukebox.
Like the Arduino version, the Arduino Nano receives SPI commands from the SAMD21 and drives the LCD display. The main advantage here is that bare 16×2 line LCD displays with RGB backlights are readily available while they are rare as Arduino LCD shields. Also the parts to build this version may be more commonly available locally without paying shipping charges.
The connections between the Arduino Nano and the LCD display are similar to the Arduino Uno/LCD Shield version but you have to wire it yourself:
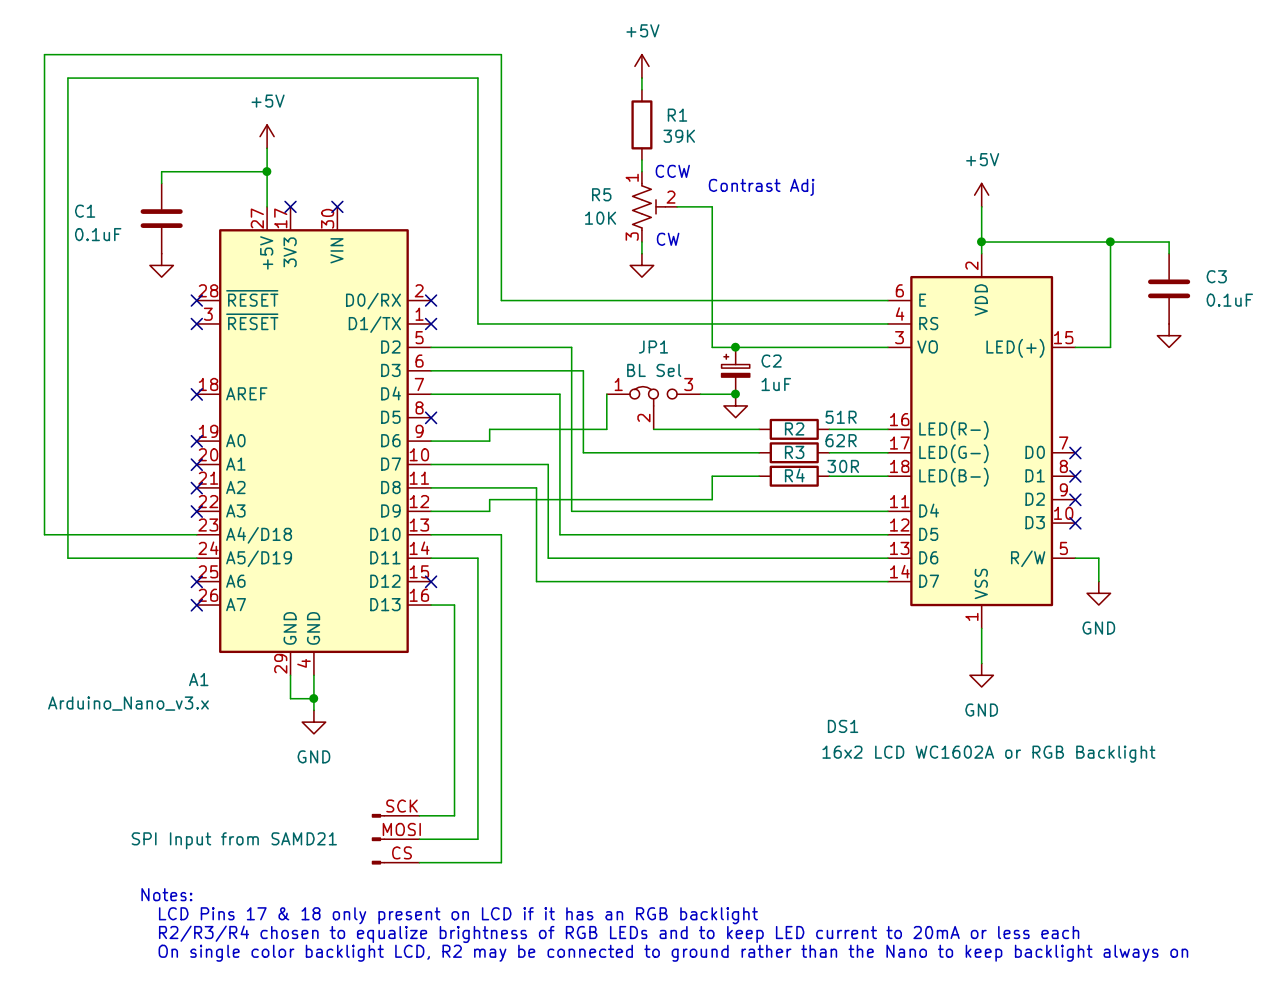
Schematic of the Arduino Nano/LCD Display version of the SerLCD Emulator. Jumper J1 is optional, see text.This version can use either a standard single-color backlight LCD display or one with an RGB backlight. The Arduino Nano pins used to connect to the display differ from the Uno version because only certain Nano pins support pulse-width-modulation analogWrite() output and we need to use those pins to control the brightness of the RGB backlight. If you are using a single-color backlight LCD, it will be missing pins 17 and 18 and only pin 16 will control the brightness of the backlight. Since the book code assumes an RGB backlight, a single-color backlight will go dark whenever the red backlight color is set off. You can either switch jumper JP1 to short positions 2 to 3 or modify the SetBLColor( ) function to always keep the red value on (or to whatever brightness value you find pleasing). If you know you will only be using a single-color or RGB backlight you can eliminate the jumper and wire pin 16 to ground or to Nano pin D6 through resistor R2.
Resistors R2 – R4 limit the current through the Nano pins and attempt to equalize the brightness of each backlight color in an RGB backlight. The Nano is rated to sink up to 40mA on each I/O pin but it is best to keep the current to 20mA or less. We connected pin 15 (LED+) of the display to 5V and initially connected each of the LED pins through a resistance substitution box and a multimeter on the milliamp range to ground. We adjusted the current limiting resistor of the dimmest LED to about 20mA (in our case it was the red backlight), then adjusted the other two LEDs to what looked like about the same brightness (but no more than 20mA). We ended up with the red LED running at 21mA, the blue at 20mA and the green (the brightest) at 15mA. However, none of the LEDs pulled more than 40mA running directly on 5V (the display contains internal current limiting resistors) so you could probably get away without the external resistors although the brightness of some colors would be much brighter than the others.
Unlike the actual SerLCD, we use a potentiometer to adjust the contrast. This is because the LCD display’s contrast input requires a low impedance source and the RC filter we added to convert the PWM output of the Nano to something closer to DC could not pull the voltage down enough to get a legible display. (The best contrast adjustment is usually between 0 and 1V.) You could add an op amp buffer or an SPI DAC if you really need to control the contrast programmatically but usually you just set it and forget it so we decided it wasn’t worth the bother.
This version will work fine with pin 10 of the Arduino Nano (i.e., the SPI chip select line) connected to ground as long as nothing else is connected to that SPI channel. This is because SPI is a synchronous protocol and the only thing the chip select line does is tell a device to ignore data sent on the SPI clock and data lines if there is more than one device using the same SPI channel.
Parts cost for the Arduino Nano version of the SparkFun SerLCD Emulator
The Arduino Nano and parallel 16×2 LCD displays are commonly available in electronics stores like Microcenter and online (eBay, Amazon, Walmart, AliExpress, etc.) although ones with an RGB backlight are a bit harder to find. Here are some representative examples (items marked with a “*” are parts we have tested and worked for us).
The Arduino Nano R3
(Other ATmega based Arduinos may work as well; however, the Nano Every uses a different microcontroller and probably will not work without extensive changes to the software below. The difference between ATmega based boards most likely would be the pins that support PWM output, so you may have to change the pin assignments if you are using a RGB backlight. If you already have another ATmega board and it works, please email me to let me know at parts@laoe.link)
All prices in USD$ as of 4/2026.
Amazon Nano V3.0 Board ATmega328P/CH340G Chip Microcontroller Kit Compatible with Arduino $11.99* for two pieces. We like these because they use a USB C connector (and come with two short USB C cables). Search “Arduino Nano R3” for other choices.
Microcenter Inland Nano 3.0 Controller Board Compatible with Arduino Nano CH340 USB Driver $4.99 (but currently on sale for $3.99*) The one we bought looks exactly like the Amazon one and also uses a USB C connector with an included cable but the current image looks like a different board than the one we got. It should still work fine. Another choice is the Inland Nano Development Board Arduino Compatible $7.99
DFRobot Nano at Digikey $5.90* (Also available direct $7.90) This one used a micro-USB connector and worked ok but will not download code unless you select “Processor: ATmega328P (Old Bootloader)” under the Tools menu in the Arduino IDE. The boards above use the default “Processor: ATmega328P.” This was annoying until we figured it out.
eBay has many choices costing only a few dollars shipped from China (which can take a while to get to you) as does AliExpress.
The 16×2 LCD1602 LCD Display with RGB Backlight
Adafruit RGB backlight positive LCD 16×2 $12.95* at Adafruit or DigiKey. We liked this display the best.
Adafruit also has a negative version (13.95*) or Digikey but we don’t think it works as well for the Lullaby Jukebox and is more expensive.
We bought this positive display 16×2 LCD with RGB backlight on eBay for $10.57* (but it is listed for $9.95 currently) with free shipping. It is shipped from the US and arrived quickly. It worked fine but we didn’t think it looked quite as good as the Adafruit one – but definitely a bargain.
Amazon has an RGB backlight 16×2 display for $13.95* that we tested and appears to be the same one as on eBay.
Here is another RGB backlight 16×2 LCD display on eBay for $11.95 with free shipping. Here is a negative version – also $11.95.
16×2 LCD1602 LCD Displays with Single-Color Backlight
Warning! Amazon lists a number of 16×2 single-color backlight displays described as having a “IIC I2C TWI SPI Serial Interface Adapter.” This is a standard 1602 LCD display with an attached I2C adapter. It will not work with SPI despite what the description says. The ones we bought have the adapter soldered in place making them unusable even as normal parallel displays. We did see some that have the adapter socketed for not much more than the display alone (two for $10). If you need a single-color backlight display and want to experiment with I2C these would be a good deal since they are no more expensive than displays without the I2C adapter.
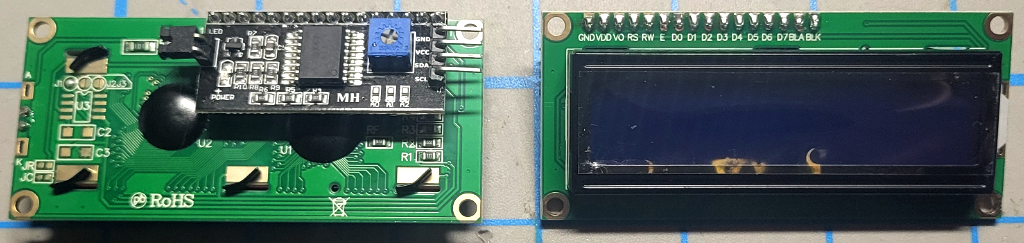
LCD display advertised as supporting SPI but actually only supports I2C input. You don’t want this.
Amazon blue backlight negative 16×2 LCD display ($5.49*)
But be careful — there are some oddball parts out there. We bought this 16×2 yellow backlight positive LCD display from DigiKey ($7.44) and discovered after it arrived that it used a non-standard pinout with the pins at the bottom of the display and pins in semi-reverse order starting with pin 14 at the left edge. It worked, but would not plug in directly to our breadboard. This was only apparent by opening the datasheet on DigiKey (which we failed to do before ordering).
Here is another oddball part, a white backlight positive display with both parallel and SPI input on eBay for $7.20. We actually would have ordered it if they did not want $11.50 for shipping. Nevertheless, the SPI input is not useful since it is supports a very different command set than the SparkFun SerLCD.
Again, AliExpress has many choices in single-color backlight LCD displays, but you have to be willing to wait for your order to show up. (Also be sure what you order does not have the I2C backpack soldered onto it and that any tariffs are included.)[2]
So, combining the Microcenter Nano with the cheapest eBay RGB backlight display would give you a replacement with all the important capabilities of the SparkFun SerLCD for about $15. (You would need to supply the trimpot, the resistors, wire, and the breadboard but those are already part of the book parts kit.)
See below for the software to load on the Arduino Uno to emulate the SparkFun SerLCD.
The SerLCD Emulator Software
Why Arduino?
In Section 22N.4.1 of Learning the Art of Electronics, we counsel “[I]f you can do what you want with an Arduino, then you should use an Arduino.” Well, we are taking our advice to heart here. All the SerLCD emulator needs to do is listen for bytes on the SPI communications channel and either handle commands or write data to the LCD display. The hard parts are listening for bytes from the SPI and driving the LCD, both of which are easily done with Arduino because there are libraries that support both functions. The SPI library almost does what we want (receiving SPI data) and the LiquidCrystal library does exactly what we want (clearing the display, setting the cursor position, and writing characters to the display) . All we need to do is write the FSM that handles the stuff in-between. There is no reason to go through the pain of creating a program from scratch the way we do for the microcontroller lessons for such a simple task.
The code for the SerLCD Emulator
In Learning the Art of Electronics Section 19W.1.10 we describe the format of an Arduino program (“Sketch”) and provide an example. There are two main steps, a setup() function that does all the initialization and a loop() function that runs forever. You can download the code for the SerLCD emulators at:
This is the Arduino sketch for the Uno/Single-Color Backlight and the Nano version: https://laoe.link/misc/SerLCD_Emulator.ino
This is the Arduino sketch for the Uno/DFRobot RGB LCD version: https://laoe.link/misc/SerLCD_Emulator_DFRobot.ino
“.ino” is the extension used by Arduino but the code is a plain text file. You can view it in notepad or other text editor. To compile it you need the Arduino IDE. We prefer the downloaded version but there is a cloud-based one as well. Start the IDE, create a new sketch and replace the default code with the SerLCD_Emulator.ino code. Then save the program under the name “SerLCD_Emulator”
The differences between the Arduino Uno/Single-Color Backlight LCD version and the Nano/LCD version are minimal so they both use the same .ino file. There is a compiler pre-processor directive
#define Nano
on line 29 that determines which version is created. If you compile as downloaded you get the Nano version. If you comment out this define (with “//” before the “#”) you get the Uno/Shield version. There is one more conditional define “debugmsg” that is initially commented out. If you uncomment it you will get informative messages on the Arduino serial monitor. This is useful if the program is not doing what you expect.
The first two lines of the program (lines 103-104) load the SPI and LCD libraries. These should be automatically available with the default Arduino IDE installation.
The program then initializes the LCD library conditionally with the Arduino pins that are connected to the LCD for each version of the emulator.
SPI communications are handled by an interrupt service routine (ISR) that is called when a byte is received. It puts each byte in a FIFO modified from the code in Section 26W.1.3 of LAoE. The main difference here is that bytes are put into the FIFO by the ISR and removed by the foreground program — the opposite of the worked example.
The setup function initializes the LCD, clears the FIFO, then initializes the SPI. Unfortunately, the Arduino SPI library only supports the Arduino as an SPI Mentor (master). Since we need it to be an SPI Student (slave) we have to do a direct register write to the SPI peripheral register that controls the M/S mode:
SPCR |= _BV(SPE); // ATmega328 direct register write
#include <LiquidCrystal.h>
#include <LiquidCrystalFast.h>
Configuring single-color backlights always on
As mentioned previously, you probably do not want the brightness of a single-color backlight LCD controlled by the Arduino. The Uno/Shield cannot control the backlight because Arduino pin 10 is used by the SPI chip select. If connected the backlight will blink briefly when SPI data is written to the display. If not connected, the backlight will be on at full brightness.
For the Nano/LCD version, you can either set jumper J1 to ground pin 16 (optionally) though resistor R2, wire R2 directly to ground, or just uncomment the last line of function SetBLColor:
//analogWrite(BLREDPIN, 0); // uncomment this line to turn backlight on continuously
[1] The main difference between the Nano version and the SparkFun SerLCD is that the LCD contrast on the emulator is set with a trimpot while the SerLCD has a serial command that adjusts contrast. You could add this to the emulator as well but it would require adding an op amp which hardly seems worth the effort since you usually only set the contrast once.
[2] Last year we ordered some printed circuit boards from China and DHL paid the $0.06 import tariff on them. DHL then charged us a $17.00 administration fee to process the tariff!